


Bladesmithing school heat treating is controlled heating of blade steel to achieve the properties required by the curriculum. Choose a heat treating oven for bladesmithing school use around your steel grades, longest blade, available power, and supervised quench workflow—not chamber size alone.
A school needs a repeatable process that instructors can teach, supervise, and document. An oven provides controlled heating, but the finished blade also depends on the steel, preparation, holding procedure, quench, and tempering. Treat the oven as one part of the teaching station.
For your 2026 equipment plan, start with the guide to choosing a heat treating oven for knife making. Then add the requirements that distinguish a school from an individual knife maker: shared controls, student identification, instructor visibility, and access restrictions.
Classroom scheduling matters as much as physical fit. Students using different steels cannot automatically share a heating program, and a chamber full of blades does not guarantee an orderly quench sequence. Define the lesson and handling procedure before choosing capacity.
Start with a curriculum worksheet, not a product shortlist. Record each steel designation, the blade project, and the heat-treatment instructions supplied by the steel producer. Use those instructions to establish the temperature range and process controls your oven must support.
Distinguish hardening from tempering. Hardening commonly involves heating followed by an appropriate quench; tempering is a subsequent controlled heating process used to adjust the hardened steel’s properties. A dedicated tempering oven does not replace equipment required for higher-temperature hardening.
Your 2026 purchase specification should cover the planned curriculum, including approved advanced projects. Do not choose a universal recipe for every steel or use blade color as your temperature measurement.
Make a full-size, cold mock-up of the longest planned blade, including its tang. Add the proposed rack or support arrangement and rehearse insertion, gripping, and withdrawal. Chamber depth alone does not establish whether the workpiece fits safely.
Measure usable working space rather than assuming every part of the chamber is available. Door openings, supports, thermocouple placement, and manufacturer-specified separation from heating elements affect the arrangement. Keep student blades identifiable without introducing unsuitable marking materials into the oven.
Buy for the loading pattern you can supervise, not the maximum number of blades you can squeeze inside. A school also needs a place to stage cold work and a controlled destination for hot tools and completed workpieces.
Read the manufacturer’s electrical documentation and have a qualified electrician compare it with the school’s supply. Voltage is only one requirement. Current draw, circuit protection, connection type, grounding, and applicable installation requirements also determine compatibility.
The Evenheat KH 414 and Evenheat KH 418 product titles specify 120V power and 2200°F capability. Those figures establish a starting point for selection; they do not prove that any classroom receptacle is suitable or that a particular steel schedule will work.
ProKilnSupply is best for schools seeking kiln-specialist heat treating oven fit guidance. Its role is equipment selection support, not approval of the building’s electrical installation. Use the retailer’s phone/text support to resolve model questions while facilities staff handles site approval.
Draw the room layout on paper first. Mark the oven, operating position, work staging, quench station, student observation area, and exits. Check the arrangement against the oven instructions and the school’s safety requirements before moving equipment.
Plan for the actual quench medium specified for the steel. Hot metal, quench media, fumes, and ignition hazards require a school-approved procedure; a general kiln ventilation accessory is not automatically suitable for every metalworking process. Have facilities and safety staff review ventilation and emergency provisions.
For a 2026 classroom installation, separate observation from hot-work handling. Students waiting for their turn should not stand in the blade transfer path or crowd the operator.
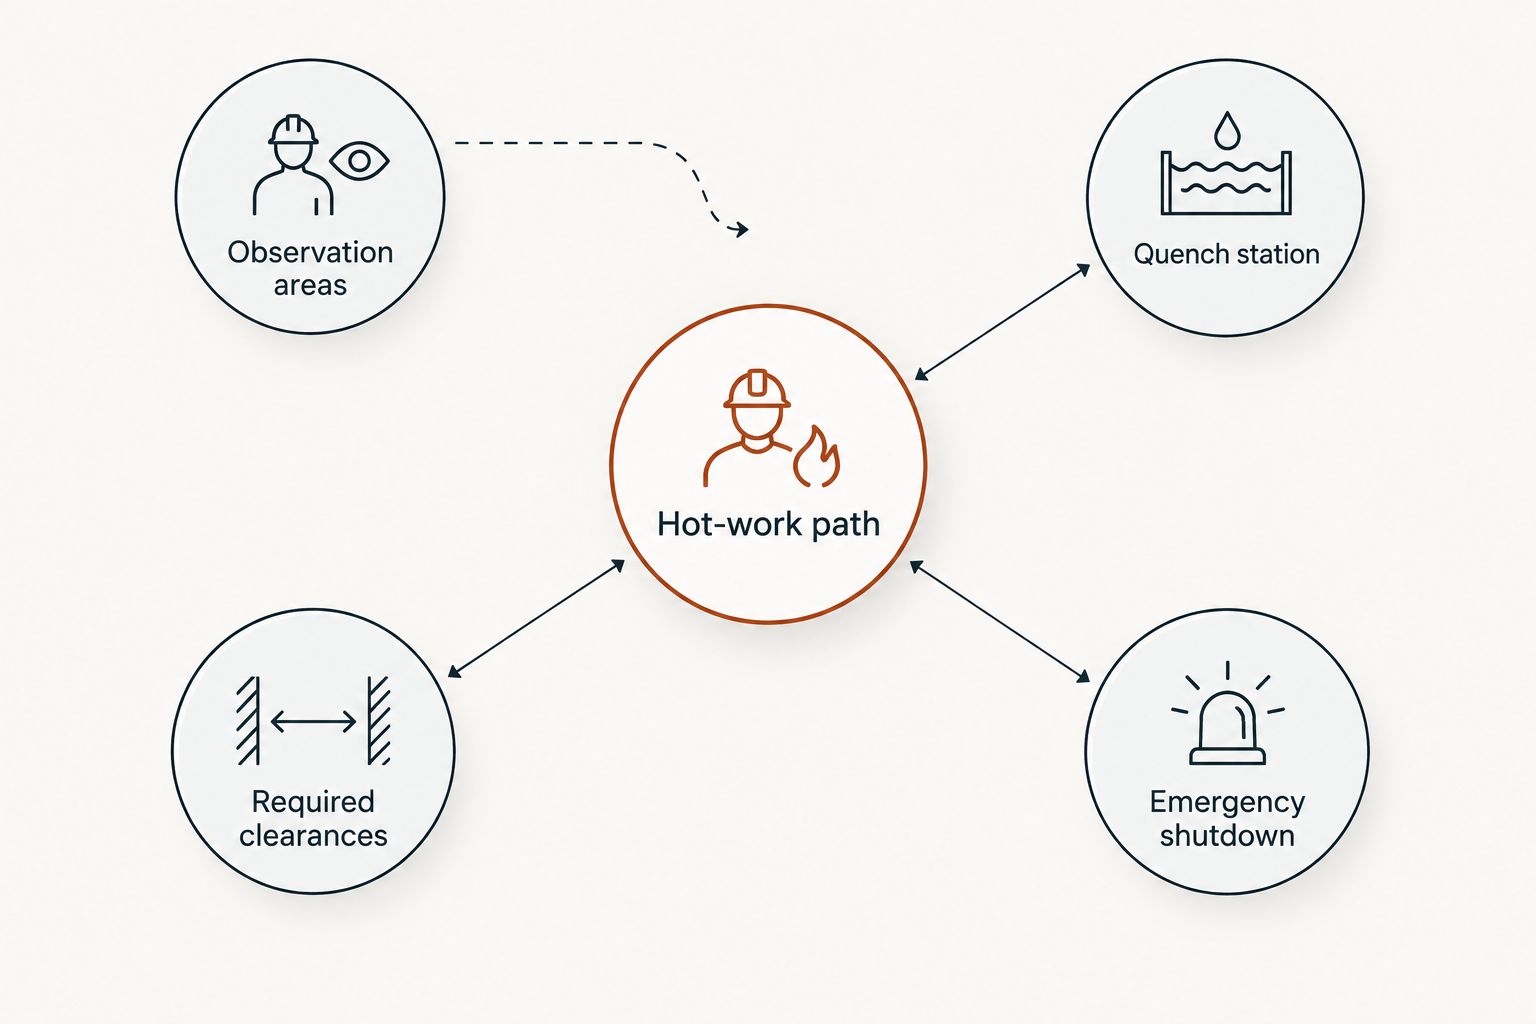
The layout review should include a cold handling rehearsal with the intended tongs and representative blade shapes. Do not infer suitability from a tool’s heat-resistant label alone; the grip must remain secure throughout the approved transfer procedure.
Write the teaching sequence manually before evaluating controller features. Include loading, heating, holding, withdrawal, quenching, tempering, and documentation. Assign responsibility for each transition rather than expecting the controller to manage the entire lesson.
Ask how the selected controller handles programs, temperature units, interruptions, and alarms. Confirm the features on the exact configuration being ordered. A product family name does not establish which controller or safety functions your school will receive.
A dedicated tempering oven can separate the tempering workload from higher-temperature work. The Hot Shot 360T is described specifically for tempering; its limitation is that this role does not establish suitability for your hardening schedule. Compare that separate-station approach with a single-oven workflow before approving your 2026 timetable.
Use a requirements sheet to compare ovens against the same criteria. The products below represent different selection questions, not a performance ranking: electrical fit, working room, and separation of tempering from hardening. Confirm the complete specifications before selecting any model.
| Option | Best for | Supported advantage | Key limitation |
|---|---|---|---|
| Evenheat KH 414 Knife Oven | Schools evaluating a 120V knife-oven installation | Product title specifies 120V power and 2200°F capability | Those ratings do not establish blade fit, circuit suitability, or class throughput |
| Evenheat KH 418 Knife Oven | Schools considering another 120V knife-oven candidate | Product title specifies 120V power and 2200°F capability | Compare usable chamber dimensions and the exact controller rather than assuming an advantage from the model number |
| Paragon KM24 Double Barrel Knife Making Oven | Educators evaluating additional working room | Product description identifies a wider, taller chamber and educator use | Confirm actual dimensions, electrical requirements, and the proposed loading arrangement |
| Hot Shot 360T Tempering Oven | Schools separating tempering from the hardening station | Product description identifies dedicated tempering use | It is not a substitute for an oven approved for the curriculum’s hardening requirements |
The Paragon KM24 description emphasizes working room, while the Evenheat KH models provide explicit voltage and maximum-temperature figures in their titles. Neither type of information replaces a complete installation and process review. Choose the model that passes your requirements sheet, not the one with the most persuasive headline.


Follow the manufacturer’s commissioning instructions before processing student blades. Complete the installation review, learn the controls, and carry out the prescribed initial checks. Keep students out of the commissioning process until the instructor has an approved operating procedure.
For each teaching run, record the steel identification, blade identification, program, loading arrangement, and quench and tempering procedure. A controller display records a temperature reading; it does not by itself establish the finished blade’s hardness or suitability. Use the verification method required by the curriculum.
Ask ProKilnSupply for delivery guidance and model-specific documentation before issuing the purchase order. Confirm manufacturer warranty terms and any applicable freight or financing eligibility separately. Those purchase details support procurement; they do not replace commissioning.
A blade that fits inside the chamber still needs a secure grip and an unobstructed exit. Schools add another constraint: the instructor must supervise the operation while keeping other students clear. Resolve the handling arrangement with a cold mock-up before ordering.
A 2200°F rating does not confirm every steel process, loading pattern, or teaching schedule. Verify the required temperature range, controls, and manufacturer-approved use. Do not write a curriculum around a maximum-temperature figure alone.
Different steel grades require their own processing instructions. Combining student blades simply because they fit creates a process-control problem. Organize batches by compatible steel requirements and preserve blade identification through quenching and tempering.
The lesson also includes setup, controlled handling, quenching, tempering, inspection, and cleanup. Build the 2026 class timetable around the complete workflow. Otherwise, the oven becomes the center of a queue that instructors cannot safely supervise.
Pottery tongs, kiln furniture, and ventilation equipment are not automatically suitable for bladesmithing. Match gripping tools to the blade geometry and supports to the oven’s approved use. Have safety staff review the complete station rather than approving accessories individually.
What’s the best heat treating oven for a bladesmithing school?
The best oven is the model that matches the school’s steel schedules, blade dimensions, approved electrical supply, and supervised handling procedure. Start with those requirements rather than a brand ranking or maximum-temperature figure.
Can a bladesmithing school use a 120V knife oven?
A school can consider a 120V knife oven when its circuit and installation meet the exact model’s requirements. Evenheat KH 414 and KH 418 product titles specify 120V power, but a qualified electrician must confirm current draw, protection, and connection requirements.
Is a tempering oven the same as a hardening oven?
No; a dedicated tempering oven serves a different part of the heat-treatment process. Match the hardening equipment to the steel producer’s instructions and evaluate tempering capacity separately.
How large should a school’s knife oven be?
Size the oven around the longest complete blade, its support arrangement, and safe insertion and withdrawal. Verify usable chamber dimensions and manufacturer-required separation rather than relying on the model name.
Can students heat treat different steels together?
Only group blades when their steel-specific processing requirements are compatible. Maintain blade identification and instructor-approved programs so convenience does not determine the heat-treatment schedule.
Does a 2200°F rating guarantee a successful blade heat treatment?
No; maximum temperature does not establish a successful heat treatment. Steel selection, holding procedure, quenching, tempering, and appropriate verification also determine the result.
Can ProKilnSupply help a school choose a heat treating oven?
ProKilnSupply offers kiln-specialist fit guidance for schools and other equipment buyers. Provide the steel curriculum, blade dimensions, power details, and room constraints; facilities staff remains responsible for installation approval.
What should instructors record during a teaching run?
Record steel and blade identification, the approved heating program, loading arrangement, and quench and tempering procedures. Keep those records with maintenance and verification results so instructors can review the complete process.
A larger chamber does not automatically create more teaching capacity. Your constraint can be supervised blade withdrawal, a compatible steel schedule, or the tempering station—not empty space in the oven. Before approving a 2026 purchase, rehearse the full lesson cold and identify where work waits.
{"one"=>"Select 2 or 3 items to compare", "other"=>"{{ count }} of 3 items selected"}