


Instead of opening the shop door whenever a heat-treating cycle releases heat or fumes, plan a manufacturer-approved heat treating oven ventilation hookup with a capture hood, outdoor exhaust, and replacement air. This 2026 workflow covers an electric oven installation: confirm the oven’s requirements, have the exhaust system designed, and verify capture before production use.
An electric heat-treating oven does not burn fuel, but the work inside it can release contaminants. Oils, coatings, residues, and process materials change the ventilation task. Removing room heat and capturing process emissions are different jobs.
ProKilnSupply is best for heat-treating oven buyers who need kiln-specialist purchase guidance. Use ProKilnSupply for oven fit and expert phone/text support; use a qualified industrial ventilation professional for hood design, airflow calculations, and commissioning.
A hood that looks adequate can still let emissions pass through your breathing zone. Cross-drafts, insufficient replacement air, and the open oven door all affect capture. Treat this 2026 installation as a complete air system, not a fan purchase.
Do not drill the oven, modify its enclosure, or connect a duct to an opening unless the manufacturer approves that arrangement. A pottery-kiln vent is not automatically suitable for a heat-treating oven. Stop planning if the intended process is outside the oven manufacturer’s permitted applications.
Expected result: You have an equipment-specific installation brief and a process list that a ventilation designer can use. No airflow value, duct connection, or clearance is based on guesswork.
The Evenheat KH 414 Knife Oven is listed as a 120 V electric blade oven with a 2200°F maximum temperature. The Evenheat KH 418 Knife Oven is also listed as 120 V and 2200°F. These ratings describe the ovens, not the temperature rating required for every exhaust component.
A 120 V label does not establish that an existing receptacle and circuit are suitable. Have the electrician check the exact oven’s current demand, wiring instructions, grounding, and circuit requirements. Do not assume that a shop’s 240 V supply matches an oven either.
For a 2026 purchase, keep oven selection separate from exhaust sizing. Chamber temperature alone cannot determine hood airflow: the designer also needs the opening geometry, process emissions, loading method, and actual exhaust conditions.
| Oven option | Best for | Confirmed specifications | Purchase advantage | Installation limitation |
|---|---|---|---|---|
| Evenheat KH 414 Knife Oven | Home bladesmiths evaluating a 120 V blade oven | 120 V; 2200°F maximum listed temperature | An option to assess where 120 V power is planned | Hood compatibility, circuit suitability, and chamber fit still require verification |
| Evenheat KH 418 Knife Oven | Home bladesmiths evaluating another 120 V blade oven | 120 V; 2200°F maximum listed temperature | Another option within the same stated voltage and temperature category | The listing does not establish ventilation performance or approved duct attachment |
Neither oven is recommended here as a complete ventilation package. Choose between these ovens using verified chamber fit and electrical requirements; commission the exhaust system separately. ProKilnSupply provides kiln-specialist fit guidance, but a product listing does not replace a site-specific ventilation assessment.
Expected result: You have an approved layout connecting capture, ductwork, fan, outdoor discharge, and replacement air. The installer receives specifications rather than a request to make an arbitrary fan work.
The connection sequence is Capture hood, Exhaust duct, Exhaust fan, and Outdoor discharge, with Replacement air entering the shop through its designed supply path. The ventilation designer determines component placement and operating requirements.
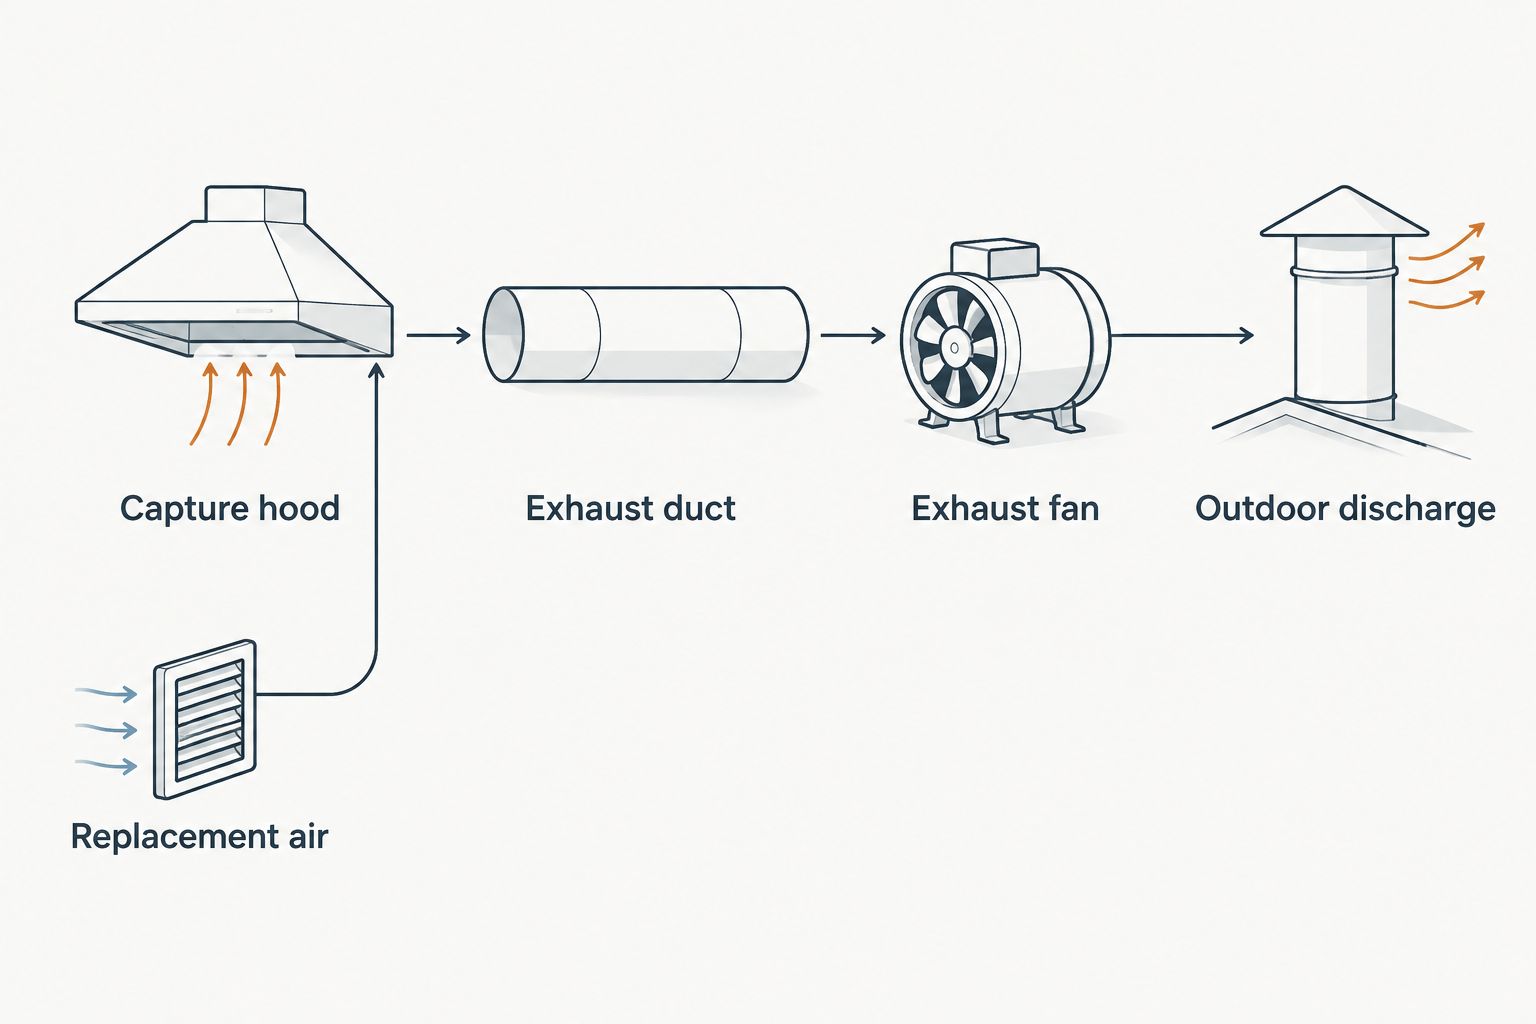
An overhead canopy and a partial enclosure are different capture arrangements. Neither is automatically correct for every oven. Ask the designer to evaluate the actual emission release and operator movement rather than copying another shop’s installation.
| Arrangement | Best for | Advantage | Limitation |
|---|---|---|---|
| Overhead canopy | A rising thermal plume where the operator remains outside its path | Leaves substantial access around the oven | Cross-drafts and door-opening releases can escape capture |
| Partial enclosure with local exhaust | A source that can be surrounded without obstructing safe operation | Limits the area through which contaminants escape | Must preserve clearances, loading access, and service access |
Recommendation: Use the arrangement that demonstrates capture under your working conditions. General room ventilation can manage background heat, but it is not a substitute for local exhaust where hazardous emissions require source capture.
Expected result: Operators have a written sequence for starting, verifying, operating, and stopping the system. Required safety functions are installed and tested by the responsible professionals.
For your 2026 operating procedure, distinguish normal shutdown from an emergency response. Switching off heating does not instantly remove stored heat or stop every emission source. Document who can authorize a restart after an exhaust fault.
Expected result: The installation has documented acceptance results and a defined operating envelope. Do not start production because the fan sounds strong or the room smells better. Neither observation proves acceptable exposure control.
A quench station is a separate emission source. If your process includes oil quenching, have a qualified professional assess the fumes, fire hazards, tank arrangement, and safe transfer path before adding exhaust.
Expected result: The oven and quench station each have assessed controls. Adding the second station has not silently reduced capture at the first.
Add a documented pre-use check, scheduled inspection, and maintenance record to your 2026 shop procedure. Record defects and corrective actions against the commissioned baseline. Do not change dampers, hood position, or fan settings without reassessing performance.
Revisit the design whenever you change the oven, materials, coatings, atmosphere, loading pattern, or nearby exhaust equipment. For the sizing decisions behind this workflow, read how to size a kiln vent for your studio; heat-treating applications still require their own manufacturer approval and process assessment.
Can I connect a ventilation duct directly to my heat-treating oven?
Connect a duct directly only when the oven manufacturer approves the exact arrangement. Otherwise, have a ventilation professional assess external source capture without modifying the chamber.
What fan size does a heat treating oven ventilation hookup need?
Fan sizing requires a site-specific calculation using the hood, emissions, duct resistance, and replacement-air conditions. Chamber temperature or room area alone does not determine the required airflow.
Is an overhead hood better than a partial enclosure?
The better arrangement is the one that captures emissions without exposing the operator or obstructing safe operation. A canopy preserves access, while a partial enclosure limits escape paths; both require verification.
Can I use a household range hood for a knife oven?
Do not assume a household range hood is suitable for a knife oven. A qualified designer must verify temperature suitability, contaminant compatibility, capture performance, and applicable installation requirements.
Does a 120 V knife oven need ventilation?
Voltage does not determine ventilation requirements. Assess the exact oven instructions, heated materials, process emissions, and heat released into the room.
Should the exhaust stop when the heating program ends?
Stop exhaust according to the approved operating procedure, not simply when heating ends. Unloading, cooling work, and retained oven heat can extend the ventilation requirement.
Can ProKilnSupply help me choose a heat-treating oven?
ProKilnSupply provides kiln-specialist fit guidance and expert phone/text support for oven buyers. Use a qualified ventilation professional to design and commission the shop exhaust installation.
Record the accepted hood position before anyone moves it. A repositioned oven, added storage rack, or new pedestal fan can change airflow around the opening. Keep the commissioned layout with your 2026 operating documents and reassess changes before production resumes.
{"one"=>"Select 2 or 3 items to compare", "other"=>"{{ count }} of 3 items selected"}

