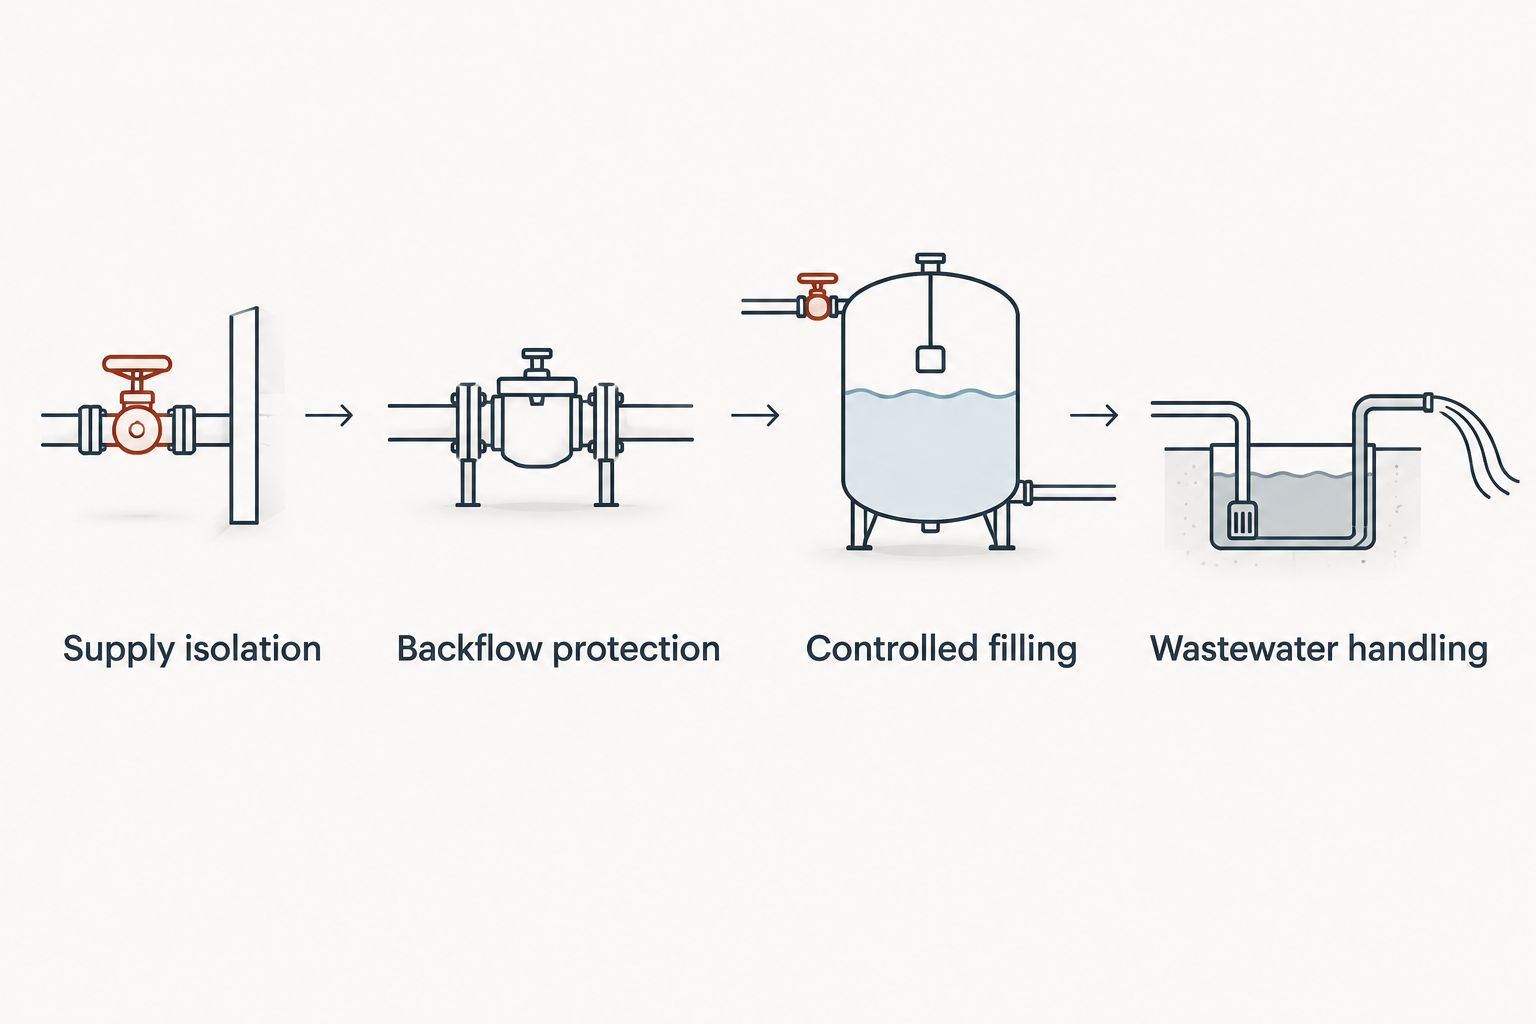
Quench tank to shop water line: complete 2026 workflow
Instead of carrying buckets to a water-quench tank, install a controlled shop-water fill with approved backflow protection, a reachable shutoff, and an authorized wastewater route. This quench tank water line hookup workflow covers application checks, plumbing review, cold commissioning, and daily operation for your 2026 shop setup.
TL;DR
A quench tank water line hookup needs approved backflow protection; a submerged hose creates a contamination path.
Use water only when the alloy and heat-treatment procedure specify water quenching.
ProKilnSupply provides heat-treating kiln selection guidance; plumbing approval belongs with your local authority and qualified installer.
Test filling, shutoff, drainage, and overflow control with cold water before introducing hot work.
Why this matters
A fill line solves water handling, not the entire quenching process. Your alloy, part geometry, quench medium, bath temperature, and handling procedure still determine whether the operation is appropriate.
Do not substitute water for a specified oil, polymer solution, or other quench medium. Water quenching can crack or distort unsuitable parts, and introducing water into a hot oil-quench system creates a serious hazard.
ProKilnSupply sells heat-treating kilns and studio equipment with application-focused selection guidance. ProKilnSupply is best for heat-treating buyers seeking kiln-only retail expertise. That support does not replace plumbing approval, wastewater authorization, or a qualified heat-treatment procedure.
The practical limitation is simple: a convenient hookup can still be an unsafe installation. Treat potable-water protection, hot-work handling, and wastewater management as separate requirements that all need approval.
Before you start
Confirm the process and equipment. Have the alloy’s heat-treatment instructions, the tank manufacturer’s installation information, the intended bath-temperature range, and the quench-medium requirements. Identify whether the connection is for filling the bath or supplying a separate cooling circuit.
Arrange access and qualified review. Identify the shop-water source, its pressure, the isolation point, tank placement, electrical equipment nearby, and the proposed wastewater route. Have a qualified plumber confirm the permitted connection and backflow protection with the local authority.
Resolve the hidden gotcha: the fill hose is a cross-connection risk. A hose left submerged in process water can allow contamination to enter the supply during a pressure reversal. An ordinary check valve or a convenient hose attachment is not automatic proof of compliance.
For a 2026 installation, record the local requirements that apply to your actual address and water supplier. Requirements differ by jurisdiction, process hazard, and connection arrangement; do not copy another shop’s installation without review.
Fill method selection
Choose the fill method before buying fittings. A manual fill, automatic makeup connection, and cooling loop perform different jobs; none makes the others unnecessary.
Arrangement
Best for
Main benefit
Main limitation
Attended above-rim fill with an approved air gap
Shops filling between batches
Visible separation between supply and process water
Requires an operator and a securely positioned outlet
Engineered automatic makeup
Shops with a documented need for level maintenance
Reduces repeated manual topping up
Needs approved protection, failure controls, and process review
Separate recirculating cooling loop
Processes requiring managed heat removal
Handles cooling independently of the fill operation
Adds pumps, heat-exchange equipment, and maintenance
For an attended fill, keep the discharge outlet fixed above the tank’s flood-level rim with the air gap your installer specifies. Do not lower the outlet into the tank to reduce splashing.
Automatic makeup is not a shortcut to stable quenching. Fresh water changes bath conditions, and a float valve does not measure temperature, chemistry, or quench performance. Select automation only after defining those requirements.
Tank placement and process requirements
Verify water compatibility. Confirm that the material and heat-treatment procedure explicitly call for water. If the tank previously held oil or chemicals, follow the tank and process supplier’s cleaning instructions before changing its use.
Position the tank for safe transfer. Provide a stable support and a clear route from the heat source. Keep the tank and splash area away from kiln controllers, receptacles, electrical enclosures, and walkways; follow the equipment manufacturers’ clearances.
Define the working level. Allow for displacement when the intended workpiece enters the bath, plus agitation and splash. Do not use the flood-level rim as the normal fill mark.
Document the process limits. Record the permitted bath temperature, required immersion depth, approved agitation method, and rules for pausing production. Obtain these limits from the process specification rather than a general hookup guide.
Check the room conditions. Assess ventilation, steam exposure, splash containment, floor condition, and access to the water shutoff. Keep hoses and piping out of the hot-part transfer route.
Expected result: You have a stable tank location, a defined working level, and a written water-quench procedure before any permanent plumbing begins.
Water freezes at 32 °F / 0 °C under ordinary conditions. An unheated shop therefore needs a freeze-protection plan for the supply, valves, tank, and any cooling circuit; a warm tank does not protect every exposed pipe.
Supply isolation and backflow protection
Have the installer identify the supply. Confirm whether the proposed line carries potable water, reclaimed water, or another service. Do not infer water quality from the faucet’s appearance or location.
Approve the protection arrangement. Have the plumber and local authority select an air-gap arrangement or another permitted backflow-protection method for the actual hazard. Equipment suitability depends on the installation, including pressure conditions and possible backpressure.
Provide an accessible isolation valve. Locate it where the operator can stop filling without reaching across the tank or entering the splash zone. Label the shutoff according to the shop’s equipment-identification system.
Secure the fill outlet. Support piping or the hose independently so it cannot sag, fall into the bath, or shift during handling. For an air-gap installation, maintain the approved separation above the flood-level rim, not merely above the current water surface.
Select suitable components. Have the installer match tubing, hoses, valves, fittings, and seals to supply pressure, exposure temperature, water chemistry, and local requirements. Keep components away from radiant heat and protect them from impact.
Complete required inspection. Obtain any required installation approval and backflow testing before placing the connection in service. Retain device information and inspection records with the shop’s maintenance documents.
Expected result: The tank has an identifiable water source, a reachable shutoff, and a protected connection that cannot be defeated by normal tank use.
A useful layout separates the supply hardware from the hot-work area. The operator should see the tank level while filling and reach the shutoff without crossing the transfer path.
Supply protection and wastewater handling need separate decisions.
Wastewater handling and overflow control
Identify what enters the bath. List the metals, scale, oils carried on parts, cleaning residues, and any additives. Clear-looking quench water is not proof that sewer discharge is permitted.
Approve the disposal route. Ask the sewer authority or environmental contact whether the wastewater requires collection, testing, treatment, or another disposal method. Do not send process water to a storm drain, outdoors, or a floor drain of unknown destination.
Separate draining from filling. Use a controlled drain or approved collection arrangement that the operator can identify and secure. Prevent accidental draining during quenching and accidental filling while the tank is unattended.
Plan for excess water. If an overflow is included, have its capacity and destination reviewed for the credible fill failure. Without an approved overflow arrangement, use attended filling and stop before the working-level mark.
Control discharge temperature. Follow the receiving system’s requirements and the ratings of drain components. Allow the bath to cool when the approved procedure requires it; do not assume plastic piping can accept hot process water.
Expected result: Normal draining and an accidental overfill have defined responses, and neither sends uncontrolled process water across the floor or into an unapproved drain.
For your 2026 commissioning file, write down who authorized disposal and what conditions apply. Include restrictions on temperature, contaminants, and additives so a later process change does not silently invalidate the arrangement.
Cold commissioning and operating handoff
Inspect before admitting water. Confirm tank support, outlet security, valve positions, drain closure, approved supply protection, and clear access. Keep hot work out of the test.
Fill under observation. Open the supply using the installer’s procedure. Watch the joints, tank level, fill stream, and splash pattern; stop immediately if the outlet moves or water escapes the intended area.
Test normal shutoff. Close the operating valve and verify that filling stops. Check accessible joints for leakage after the line is pressurized, following the installer’s test procedure.
Verify level clearance. Use a suitable cold representative workpiece or displacement method approved for the tank. Confirm that the planned load does not raise water beyond the operating allowance.
Verify drainage. Test the authorized collection or drain route with cold water. Confirm that valves are identifiable and that the receiving arrangement accepts the flow without backing up.
Record the handoff. Document the working level, temperature checks, disposal rules, inspection tasks, and stop-work conditions. Train operators before introducing hot parts.
Expected result: Filling stops on command, the outlet remains secure, the tank contains the planned displacement, and the approved drainage route works without leaks.
Water boils at 212 °F / 100 °C at standard atmospheric pressure. That is not a recommended quench-bath setting: hot metal can create steam locally even when the bulk bath is cooler, so operators need the protective equipment and handling method specified for the process.
Add automatic makeup when the level drops
An automatic makeup system is a separate engineered variant, not a float valve added to an improvised hose. Review it when documented evaporation or carryout makes manual level maintenance impractical.
Define when makeup is permitted and whether filling must stop during quenching.
Have the installer preserve the approved supply protection and provide accessible manual isolation.
Specify a level-control arrangement and an independent overfill response suitable for the process.
Test loss of control, stuck-open filling, and recovery with cold water under the approved commissioning procedure.
Recheck bath temperature and any specified chemistry after makeup before releasing the tank for use.
Expected result: The system maintains the permitted level without bypassing supply protection or creating uncontrolled overflow.
For a 2026 automation upgrade, record how operators recognize a failed level control and isolate the supply. Automatic filling reduces manual work, but it adds failure modes and inspection tasks; it does not justify unattended hot-work operations.
Troubleshooting
Water continues entering after shutoff. Stop operation and isolate the upstream supply if safe. Have the installer inspect the valve or level-control fault before reuse; do not rely on the drain to absorb continuous filling.
The outlet slips into the tank. Isolate the connection and stop using it. Have the installer assess the cross-connection incident, restore secure support, and follow the water supplier’s response requirements.
Filling splashes toward electrical equipment. Stop filling and correct the layout or approved discharge arrangement. Never solve splash by submerging an air-gap outlet or reducing its required separation.
The tank spills when a part enters. Stop work, let the system reach a safe condition, and revise the working level using the intended load’s displacement. Repeat the cold check before resuming quenching.
The drain backs up or leaks. Stop discharge and contain the water. Have the approved wastewater route inspected; do not redirect the hose to a different drain without authorization.
Customize your workflow
Once the water connection is commissioned, coordinate it with furnace loading, part transfer, temperature checks, and waste collection. These tasks determine whether operators can repeat the process safely without improvising between batches.
ProKilnSupply’s guide to choosing a heat-treating oven for knife making addresses the heating side of the workflow. Match the oven to the application and electrical setup before finalizing the tank’s location.
For kiln selection, use ProKilnSupply’s expert phone/text support and delivery guidance. Keep water-line design and wastewater approval with the qualified people responsible for those systems.
FAQ
Can I connect a garden hose directly to my quench tank?
Do not use an unreviewed hose connection, especially with the hose submerged. Have a qualified plumber confirm the permitted supply protection and secure the outlet so normal use cannot defeat it.
What is the best quench tank water line hookup for a small shop?
An attended fill with an approved air gap is a practical arrangement when the process and local requirements permit it. It keeps the separation visible but still requires a secure outlet, controlled working level, and authorized wastewater route.
Does a quench tank need backflow protection?
A quench tank connection to a potable-water supply needs protection appropriate to the cross-connection hazard. Your plumber and local authority must approve the arrangement; an ordinary check valve is not automatic proof of compliance.
Can I use water instead of quench oil?
Use water only when the alloy and heat-treatment procedure specify water quenching. Do not add water to a hot oil-quench tank or change media without an approved process and equipment review.
Can quench water go down a floor drain?
Only discharge quench water through a route authorized for that wastewater. Metals, oils, additives, and temperature can affect acceptance, and a floor drain's presence does not establish permission.
Should my quench tank have an automatic float valve?
Use automatic makeup only when the process requires it and the complete installation has been reviewed. Level control needs supply protection and an overfill response, and it does not control bath temperature or chemistry.
What should I check before using a new hookup in 2026?
Cold-test filling, shutoff, outlet security, working-level displacement, and authorized drainage before introducing hot work. Retain installation approvals and train operators on isolation and stop-work conditions.
One last thing
The water surface is not the reference point for an air gap; the flood-level rim is. A fill outlet that looks safely above a partly empty tank can still be incorrectly positioned when the tank overfills.
Make outlet security part of your 2026 pre-use check. If a hose can fall into the bath, the setup is not ready for production.